Whether you’re looking to create a subtle fade effect or need to quickly and easily make an image disappear, Figma has the tools you need. In this tutorial, we’ll show you how to fade an image in Figma. Let’s get started!
How to fade an image in Figma
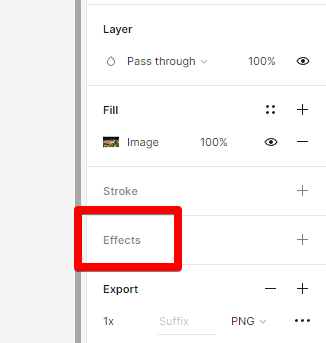
Fading an image in Figma is a simple process that can be accomplished in just a few steps. First, select the image you wish to fade.
Next, go to the Effects tab and click on the Fade option. Finally, adjust the opacity of the image until you are happy with the results.
Fading an image can be a great way to create a subtle effect or simply to reduce the intensity of an image. By adjusting the opacity of an image, you can create a wide range of looks, from a very light fade to a nearly invisible one. Experiment with different settings to find the perfect look for your project.
Fun Fact: What causes photos to fade naturally
When an image fades, its color may disappear, and its clarity will diminish. Photos devoid of color often suffer from a loss of detail, with edges blending into the background or entire sections of the image simply disappearing. Some previously invisible white spots on the print may also appear.
Photographs typically fade due to these factors:
Effects of Ultraviolet (UV)
Placing a photograph in direct sunlight is a fast way to ruin its quality. The chemical reactions occurring on the surface of the photograph are damaged as a result of ultraviolet, or UV, rays, which interact with the reactions taking place. When plastic is exposed to ultraviolet light, the color-producing molecules within the plastic degrade and disappear, leaving behind white spots.
Pollutants in the air
While direct sunlight is the primary culprit in photo deterioration, air pollution also plays a role. Unprotected photographs can fade and deteriorate due to the constant cocktail of dust, aerosols, cleaners, and smoke (from cigarettes, fireplaces, or cooking).
Adhesives
Photos adhered to surfaces with tape or glue can stay put for a long time, but how safe is that practice in the long run? Without a doubt, photos will be ruined by the adhesive in tape or glue. Photos damaged by sticky residue not only look and feel tacky but also lose color due to changes in the chemical composition of the photo’s ink.
A large, faded stain will appear where the adhesive was if you leave a picture stuck to a wall or glued into a scrapbook for too long.
Paper
If you print a photo on acidic paper or keep it in an acidic paper envelope, you’re speeding up the photo’s decomposition. Check for the words “acid-free” on the label before deciding to store your photos on paper, which may not provide the best protection anyway. You should not use yellowing paper for your photographs.
Photo albums and scrapbooks
As we’ve already established, scrapbooks present a unique danger due to the potential for harm from both acid and adhesives. The deterioration of a scrapbook’s pages over time—which may reveal a yellow, brown, or orange hue—can’t bode well for the photos contained within. Photos often suffer damage when stored in old magnetic scrapbooks or photo albums.

Make sure your photo albums are acid-free before you start using them, regardless of whether they are made of paper or plastic. Never use glue on a photo that is your only copy; instead, make another print or scan a copy to prevent the original from being destroyed.
Fungal infestations
Brown splotches caused by fungus are more of an eyesore than a fade when it comes to your old photographs. This typically occurs when a photograph is kept in a damp or humid environment. At first glance, the fungus may look like a few spots of dirt, but severely affected photos will have numerous brown fungal spots throughout the image.
Preventative measures against photo deterioration can be helpful, but safe storage and frequent digital backups are the most reliable ways to ensure your photos will remain in pristine condition. Keep your photographs in acid-free, airtight sleeves and stack them in a waterproof, dark box. They will be safest in a slightly cool, dry location, so put the box there.
Conclusion
If you want to know how to fade an image in Figma, there are a few simple steps you can follow. First, select the layer of the image that you want to fade. Then, go to the opacity setting and lower it until you achieve the desired effect. You can also use the gradient tool to create a more gradual fading effect.
Keep in mind that these methods will only work if your image is on its own layer – if it’s not, you won’t be able to adjust its opacity independently from other elements in your design.