There are a few different ways that you can add scrolling images in Squarespace. One way is to use the built-in Carousel Block. This block allows you to add multiple images and set them to scroll automatically.
To add a Carousel Block:
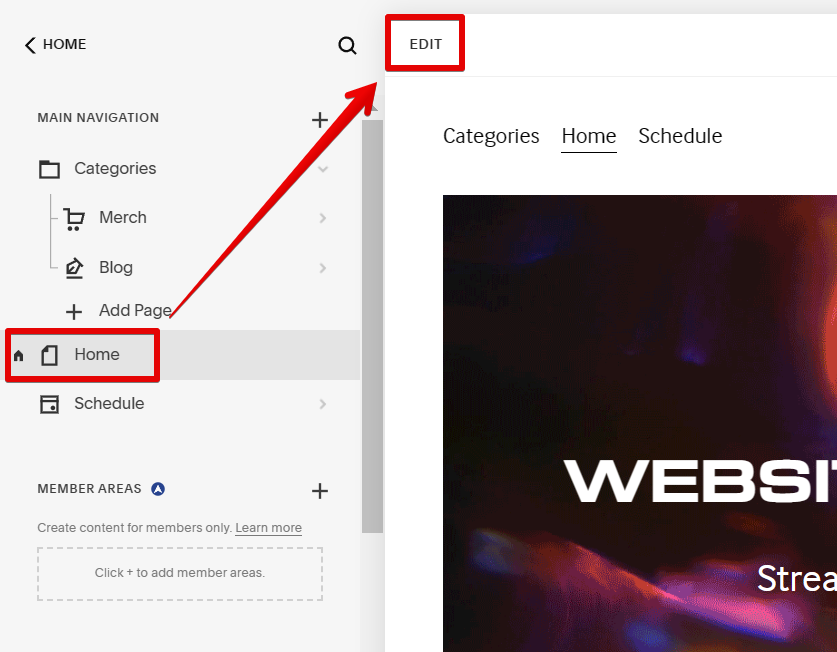
1. Log in to your Squarespace account, then select the page where you would like to insert images and click on the “Edit” button.
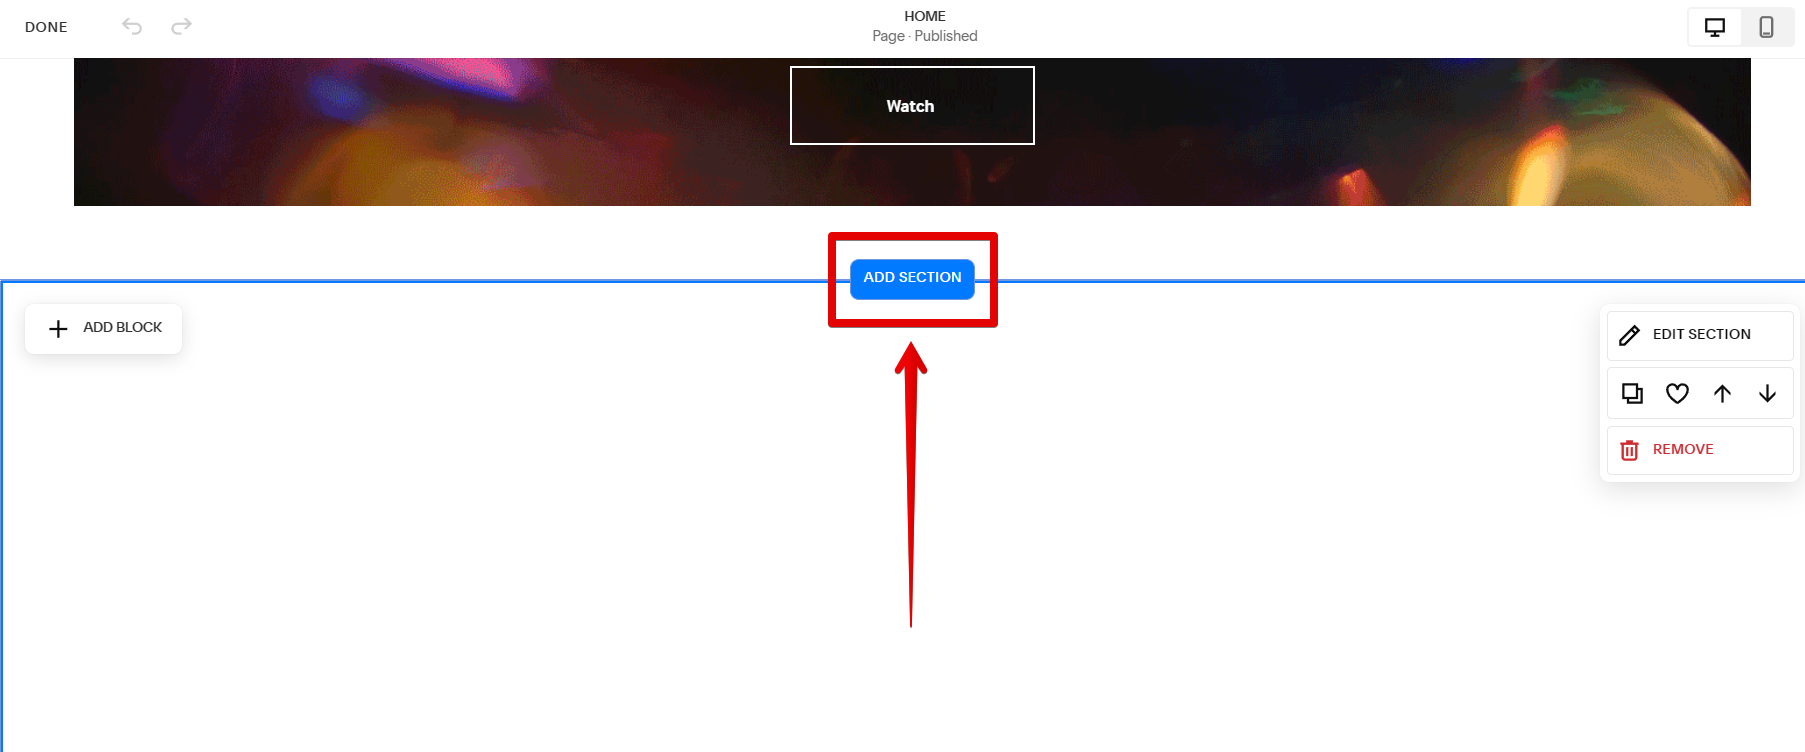
2. Click the “Add Section” sign on the area where you want to add the block.
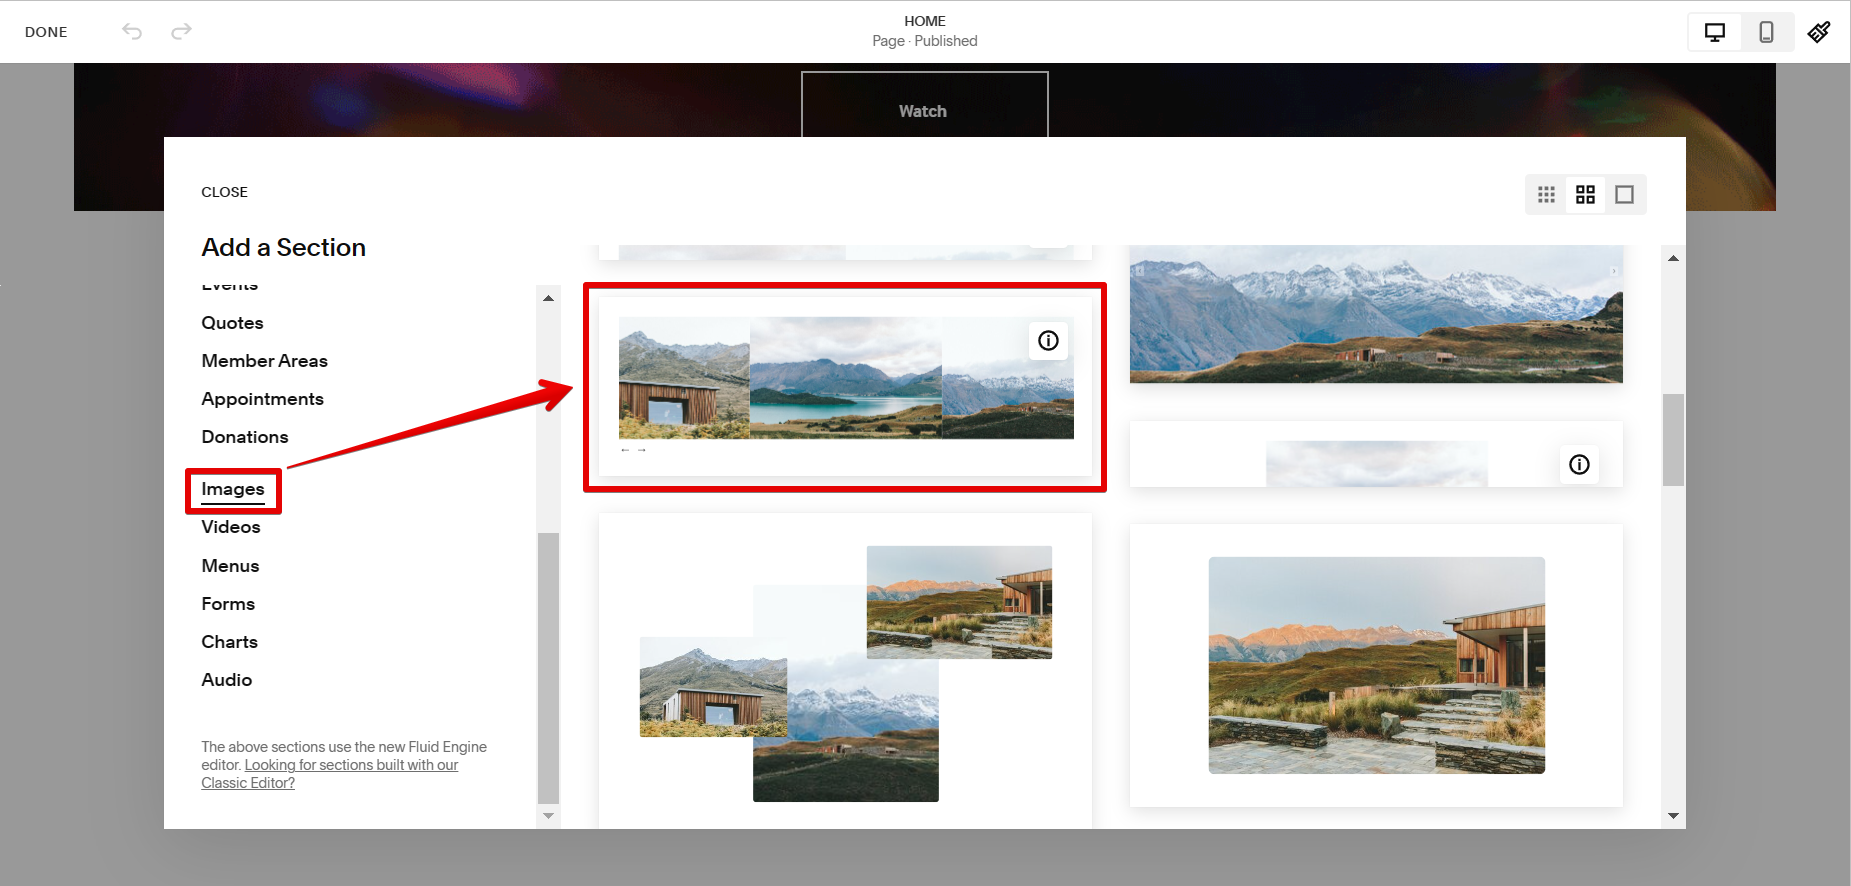
3. In the pop-up window of the Section, scroll down on the left menu and click on “Images”, then select the carousel type from the list of blocks.
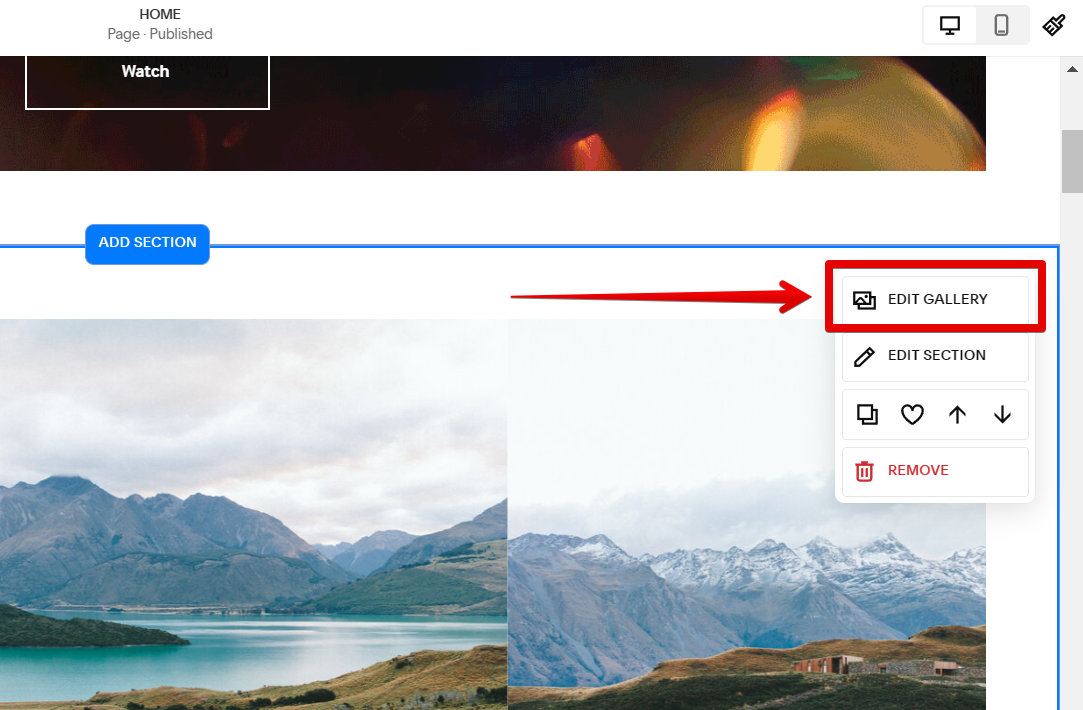
4. Once done, click the “Edit Gallery” button located at the right portion of the section.
5. In the pop-up window, select the images you want to include in the carousel by clicking the “+” button. You can also add captions for each image by placing your text in the “Description” section.
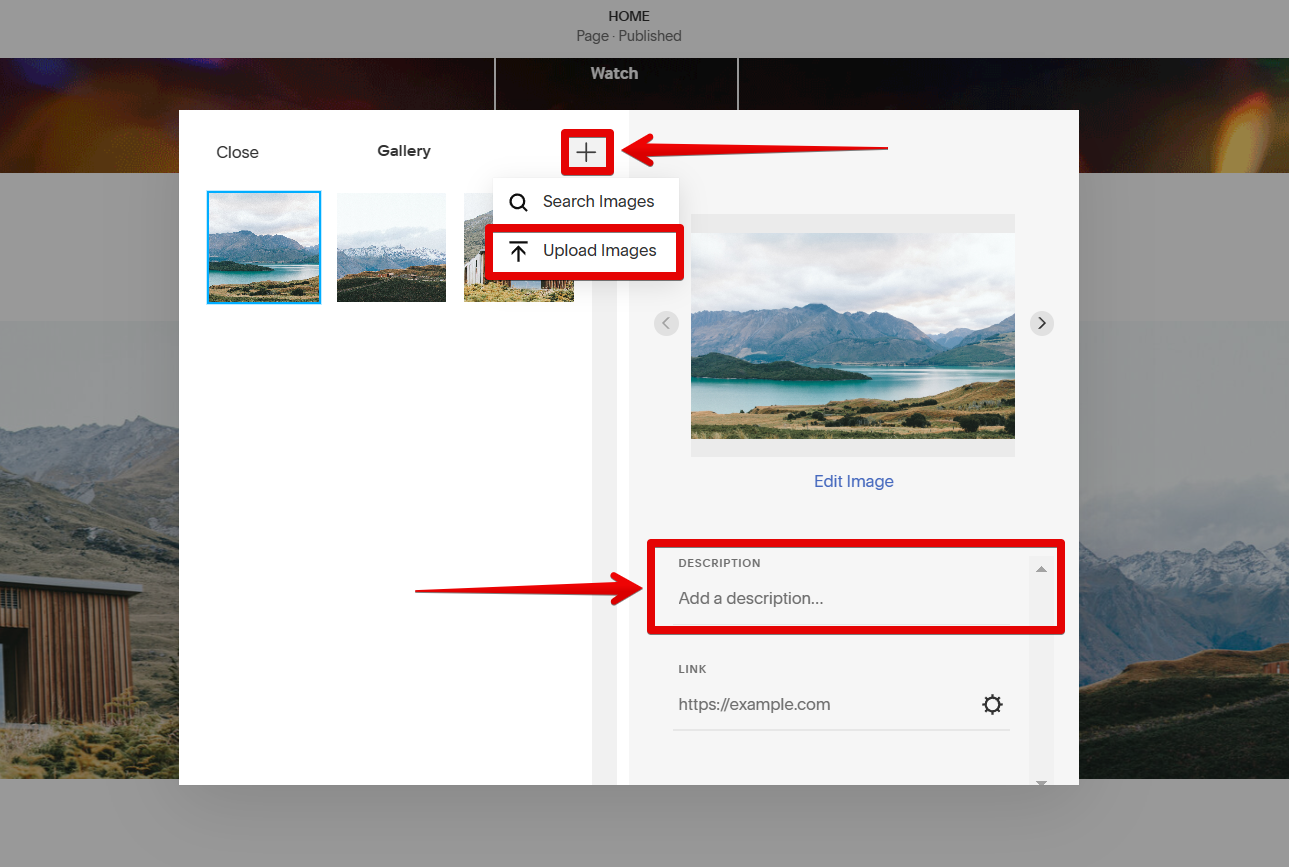
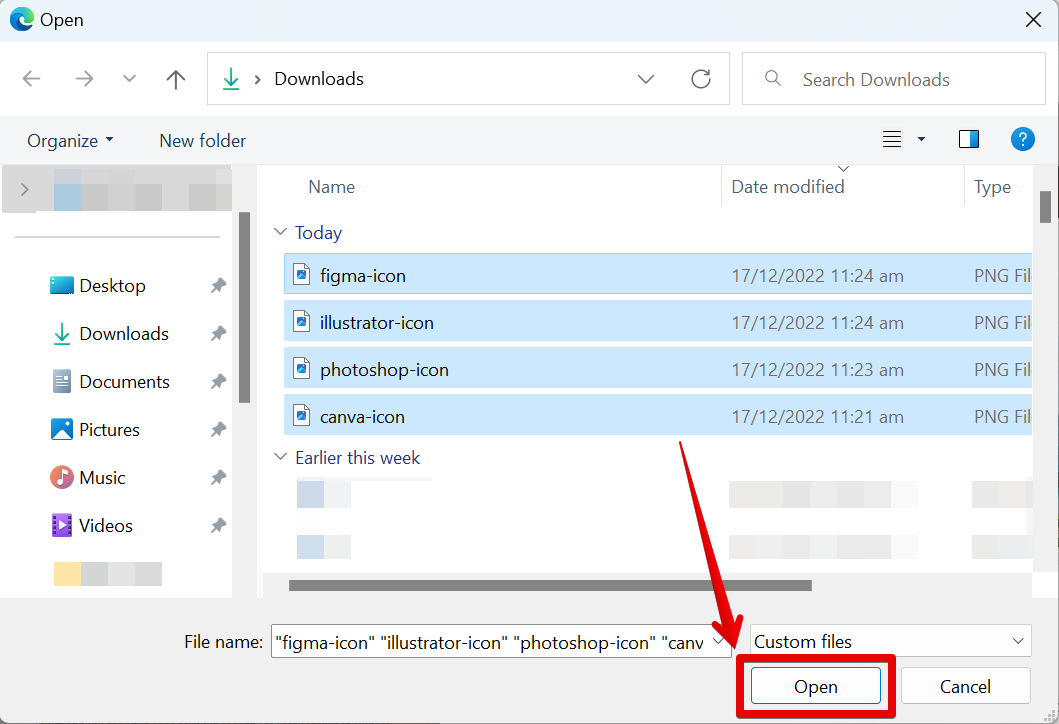
6. Browse for the images that you want to add, then click on “Open.”
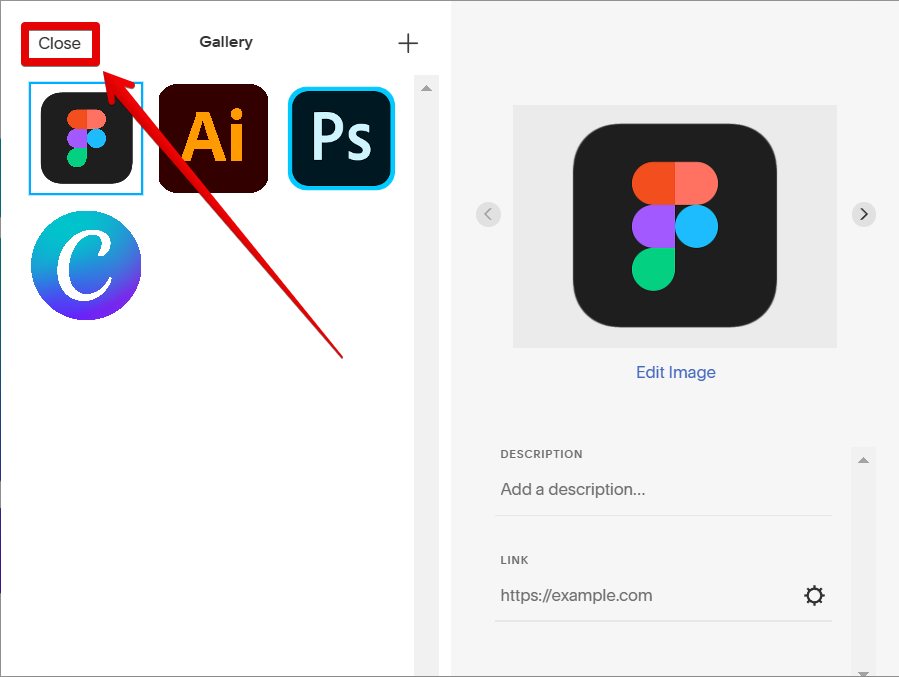
7. Once you’ve uploaded all of the images you want, click “Close.”
NOTE: You can also delete images using the trash can icon at the upper right part of the image itself.
8. The next step is to click on the “Edit Section” button.
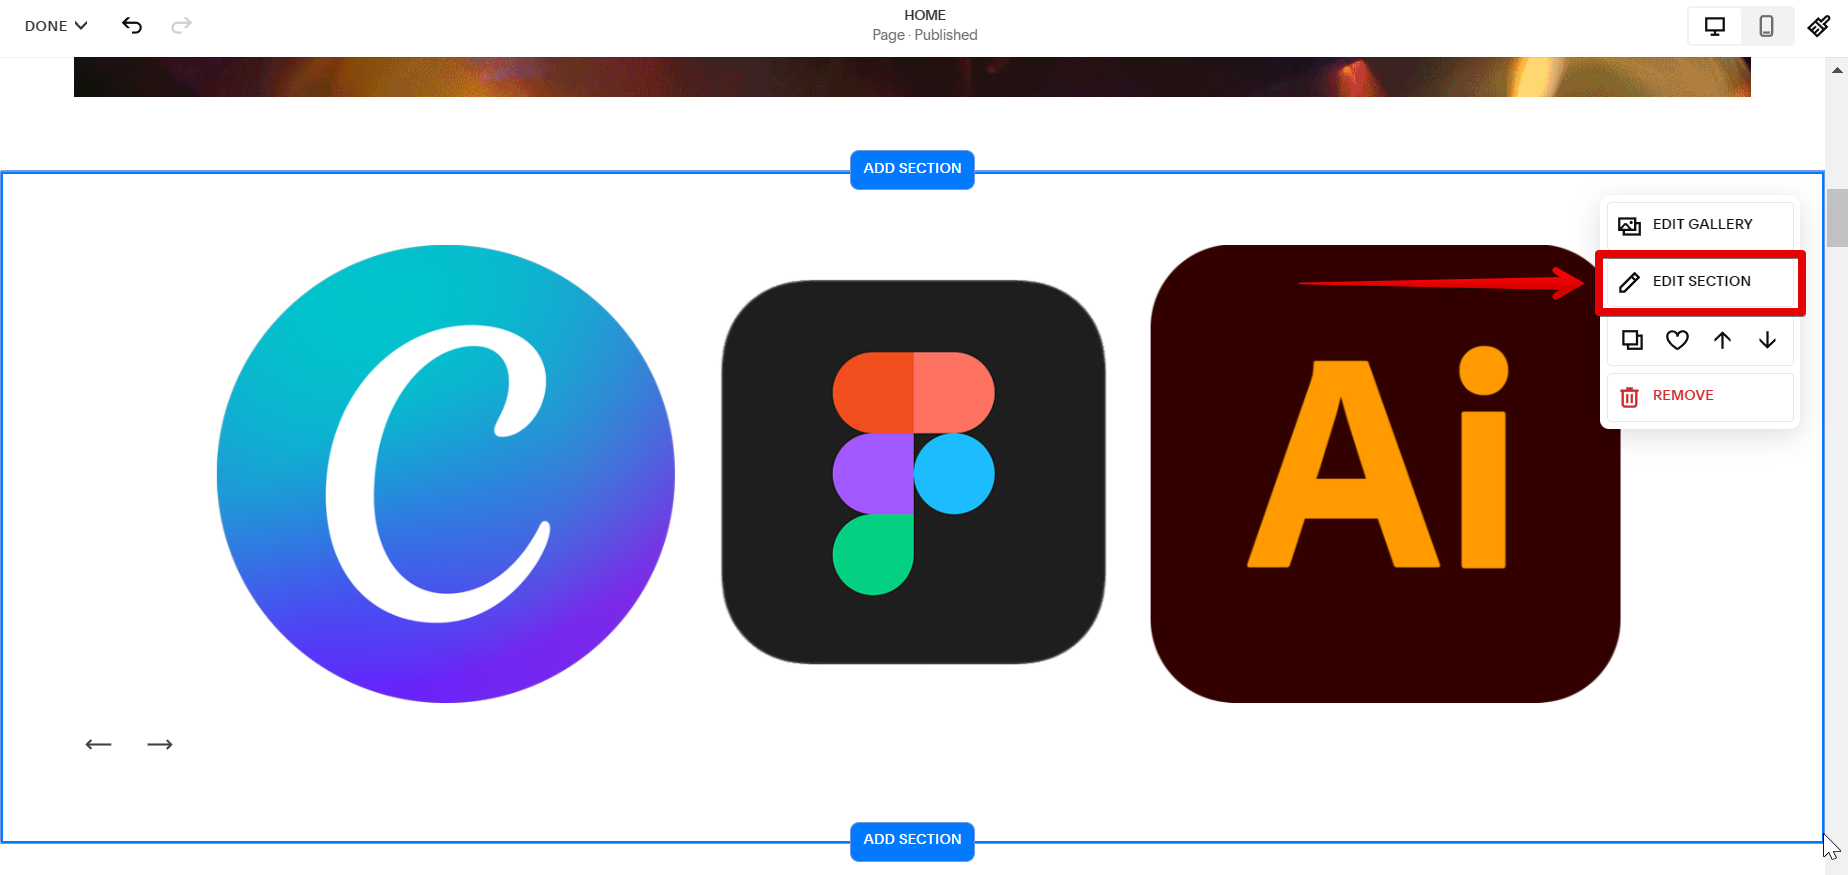
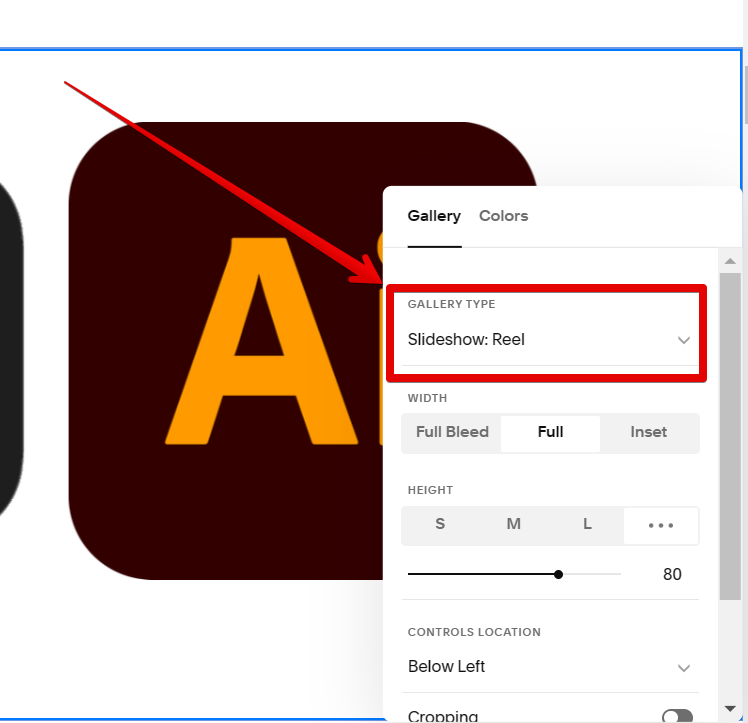
9. In the pop-up window, make sure to select “Slideshow: Reel” for the Gallery Type.
10. Click on the “Done” button in the upper-left corner to save your changes.

PRO TIP: Please be aware that adding scrolling images to your Squarespace website may negatively impact your website’s performance. Additionally, if not done correctly, scrolling images can create a jarring and unpleasant user experience. If you are unsure about how to properly add scrolling images to your website, we recommend seeking out professional help.
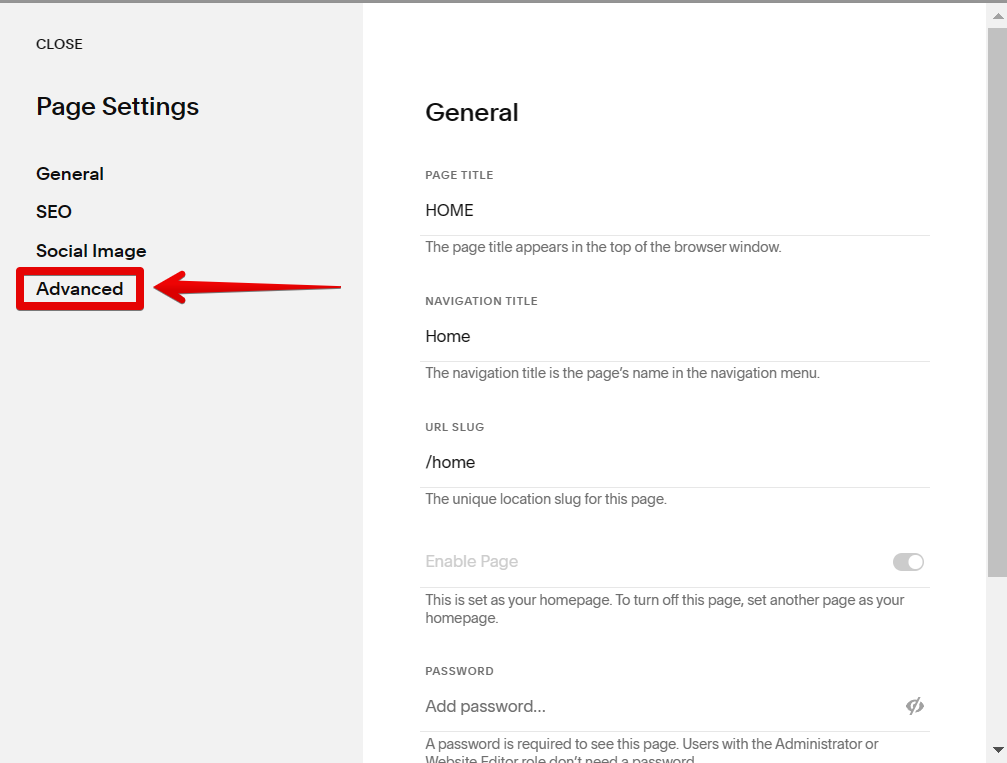
11. To adjust the settings for your carousel, click the gear icon beside its page location.

12. In the Page Settings window, go to the “Advanced” tab.
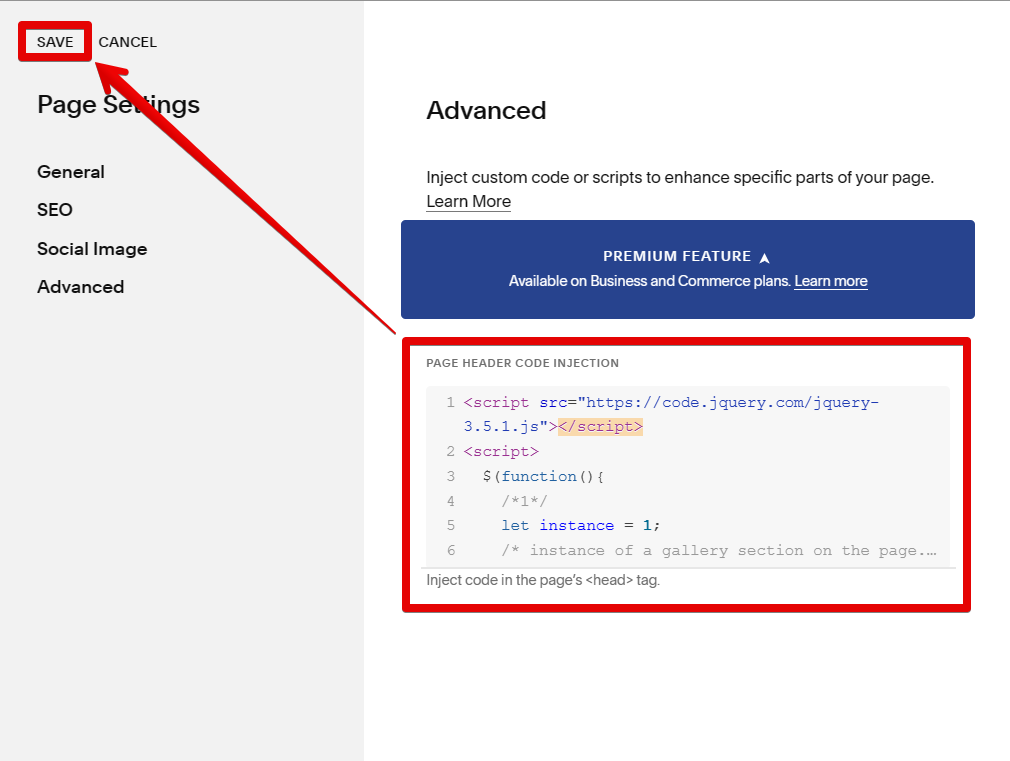
13. Paste the code below in order to automate the scrolling of your images in the gallery section. When you’re finished making changes, click “Save.”
NOTE: Here you can set which gallery section is shown (if you have more than 1 on a page), how fast the images scroll, and whether they scroll forward or backward. Notes can be found within the code.
<script src=”https://code.jquery.com/jquery-3.5.1.js”></script>
<script>
$(function(){
/*1*/
let instance = 1;
/* instance of a gallery section on the page.
1 = the first gallery section on a page,
2 = the second gallery section on a page*/
let direction = 2;
/* 1 = backwards,
2 = forwards*/
window.setInterval(function(){
if ( $(“body:not(.sqs-edit-mode-active, .sqs-edit-mode) .gallery-reel”).length > 0 ) {
$(‘html:not(.sqs-modal-lightbox-open) .gallery-section’)[(instance – 1)].querySelector(‘.gallery-reel-control:nth-of-type(‘ + direction + ‘) .gallery-reel-control-btn’).click()
}
}, 2000);
});
</script>
14. The changes made won’t be seen in the Editor mode. For this, you need to enter the Full-screen mode, and to do that, go to the upper-right section of your page, then click the arrow icon.
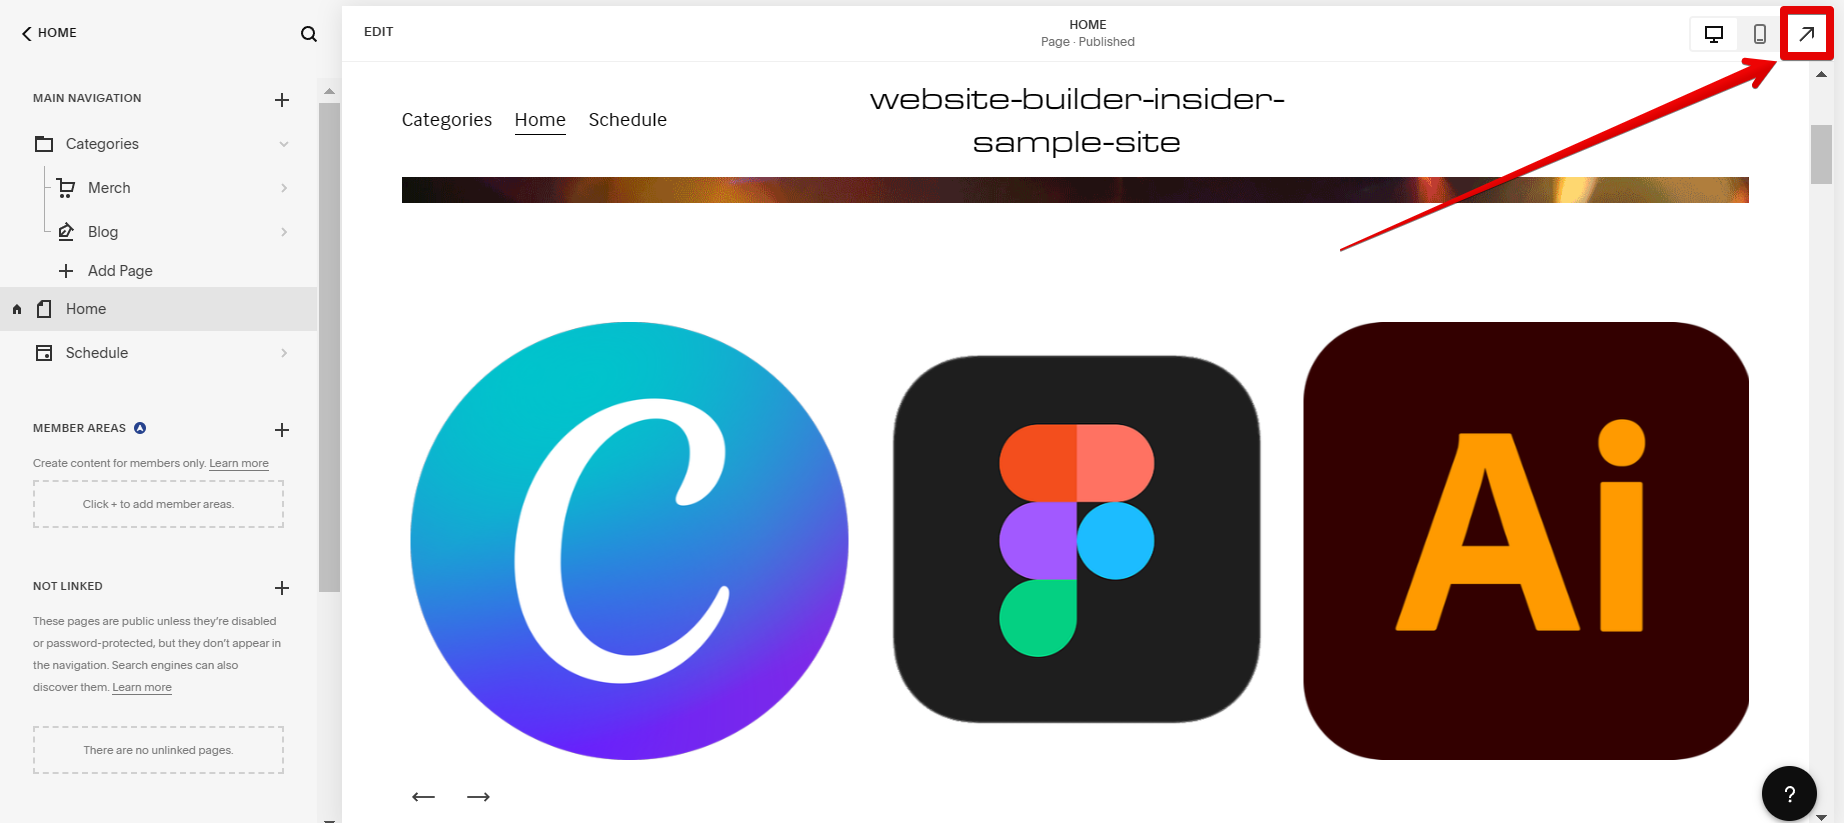
15. Now you have your automatically scrolling images in action!
8 Related Question Answers Found
There are many ways to add scrolling text to your Squarespace website. One way is to use the <b> HTML <u> tag. This tag allows you to style text in HTML using the <p> and <b> tags where applicable.
How Do I Crop an Image in Squarespace? One of the great things about Squarespace is that it offers a wide range of options when it comes to cropping images. You can crop images in a number of different ways, depending on the look you’re going for.
Adding Images to Squarespace
To add an image to your Squarespace site, follow these steps:
1. Log in to your Squarespace account.
2. Click on the “Site” tab on the left-hand side of the screen.
3.
When it comes to website design, there is a lot you can do with Squarespace. One of the great things about this platform is that it makes adding moving text to your website very easy. In this article, we will show you how to add moving text to Squarespace in two different ways.
There are a few ways to move an image in Squarespace. You can use the drag-and-drop editor, or you can use the code editor. To move an image using the drag-and-drop editor, simply click on the image and then drag it to the desired location.
Images can be inserted into Squarespace through the use of the Insert Image button located in the Editor toolbar. Once an image is selected, the Insert Image button will become available. The following steps will guide you through inserting an image into your Squarespace blog:
1.
Adding images to your Squarespace pages is a great way to add visual interest and break up text. You can add images to content blocks, gallery pages, and blog posts. In this article, we’ll show you how to add an image to a page or post in Squarespace.
If you’re anything like me, you love finding new photos to use on your website. But sometimes, you just don’t have the time or money to buy new photos every time you want to update your site. So, how do you reuse images in Squarespace?