If you’re a designer, chances are you’re familiar with Figma. It’s a great tool for designing user interfaces, and one of its best features is the ability to export vector assets. Here’s how to do it:
1. Open the file you want to export in Figma.
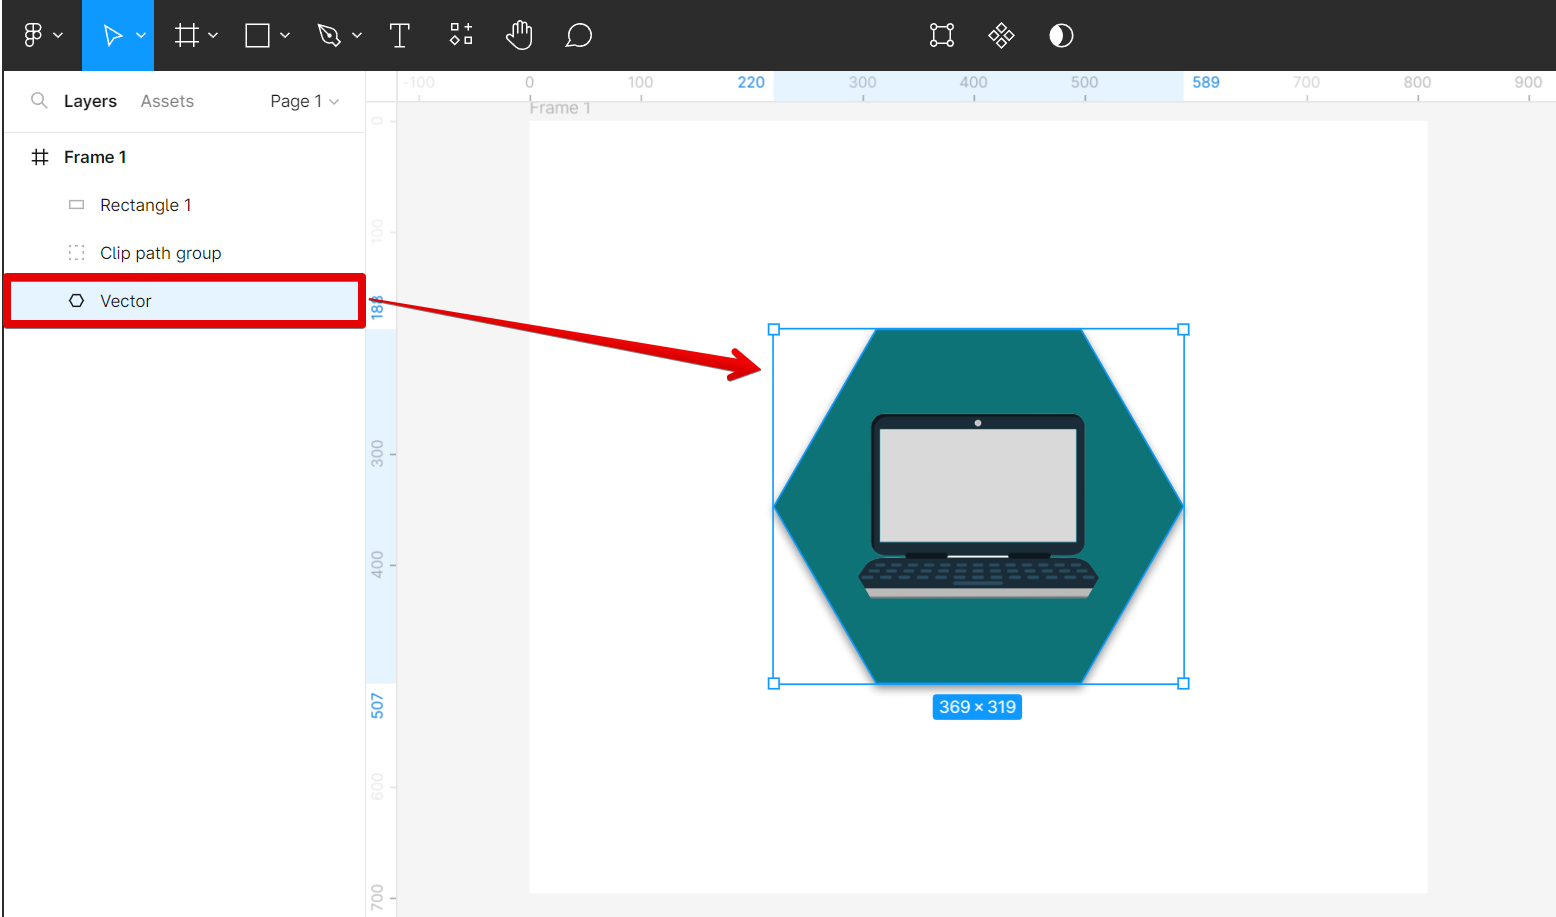
2. Select the layer of vector or shape you want to export.
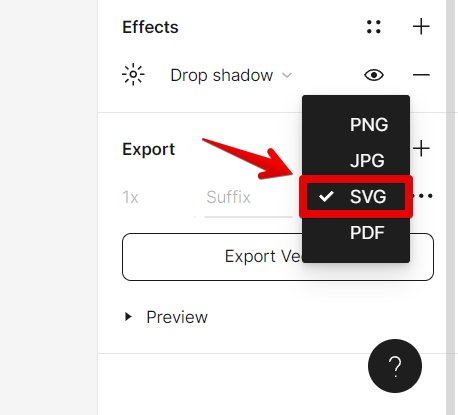
3. Click on the Design tab, then go to the Export section and click on the “+” icon.

4. In the Export menu that appears, make sure the Format is set to “SVG.”
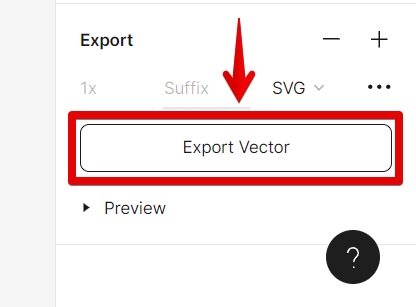
5. Click on the “Export Vector” button.
6. Save the file to your computer.

Congratulations! You’ve just exported a vector from Figma.
PRO TIP: When exporting a vector from Figma, be sure to use the “SVG” option and not the “PNG” or “JPG” options. Exporting it as a vector as an “SVG” file will result in a lossless file that can be resized without losing quality, whereas downloading the vector as “PNG” or “JPG” will result in a rasterized image that will lose quality when resized.
10 Related Question Answers Found
How Do I Export a Vector in Figma?
When you’re ready to export your Figma design, there are a few things to consider. In this article, we’ll cover everything you need to know about exporting vector files from Figma. There are two ways to export vector files from Figma:
Method 1: Export your design as an .svg file
Method 2: Use the “Copy as HTML” feature
Method 1: Export your design as an .svg file
To export your design as an .svg file, simply select File > Export.
Can I Export Vectors From Figma?
Figma is a powerful vector drawing and animation tool, but can it export vectors for use in other applications? The short answer is yes, Figma can export vectors in a number of different formats. SVG is the most popular format for exporting vector graphics from Figma.
Can You Export Vectors From Figma?
Figma is a vector-based design tool that is gaining traction among web and app designers. The biggest advantage of Figma over other design tools is its ease of use and collaboration features. With Figma, multiple designers can work on the same file at the same time, and everyone can see each other’s changes in real-time.
How Do I Export a Component From Figma?
As a Figma user, you may find yourself wanting to use a specific component that you created in another project. Or maybe you saw a file someone else shared and want to use one of the components in it. Whatever the case may be, it’s easy to export a component from Figma.
How do I export a font from Figma?
If you’ve ever used Figma for your design projects, then you know how essential fonts are in creating professional designs. But what if you want to use those same fonts in other applications? Fortunately, exporting fonts from Figma is a straightforward process that anyone can do.
How Do I Import a Vector Into Figma?
There are three ways to import vector files into Figma:
Upload the file
Drag and drop the file
Copy and paste the file
To upload the file:
Click on the “Upload” icon in the left sidebar. Click on the “Select a file from your computer” button. Select the file you want to upload and click on the “Open” button.
How Do I Export Fonts From Figma?
If you’re a web designer, you know that finding the perfect font for your project can be a daunting task. You want something that is both stylish and easy to read, but you also don’t want to spend hours combing through hundreds of different fonts. Luckily, Figma makes it easy to export fonts from your projects so that you can use them on your website.
Can I Import Vector to Figma?
There is a lot of debate amongst designers about which design software is better, Figma or Sketch. While both have their pros and cons, one area where Figma definitely has an advantage is its ability to import vector files. Unlike Sketch, which requires you to convert your vector files to .pngs or .jpgs before importing them, Figma can import vector files directly.
How Do I Export an Animation From Figma?
There are a few different ways that you can export an animation from Figma, depending on what you need it for. If you want to export your animation as a video file, you can use the ‘Export as Video’ option in the File menu. This will render your animation as a .mp4 file, which can be played back in any video player.
How Do I Export Items From Figma?
There are a few ways that you can export items from Figma. The first way is to select the item that you want to export and then click on the “Export” button in the top bar. This will bring up a menu of export options.