If you’re looking for a way to make your designs stand out, a shadow effect can be just the thing.
Adding shadows to your Canva designs can add depth, dimension, and drama to your graphics. With just a few clicks, you can easily create a stunning shadow effect for your next project. In this article, we’ll walk you through how to make a shadow effect in Canva.
In this tutorial, you’ll learn how to choose a shadow color, how to adjust the shadow size, and how to make sure the effect looks professional. With these tips, you’ll be able to quickly and easily create a stunning shadow effect for your designs that will surely grab attention and make your projects stand out!
What does shadow effect mean in design?
Shadows are useful because they indicate where things go, which way things are moving, and where things end. The height and proximity of other surfaces determine the length of the shadow cast by a given surface.
The width and dispersion of a shadow can be as narrow as a line or as broad as a cloud. They can be thin and white to draw attention to a specific part of a design or thick and dark to create the illusion of depth. When applying a shadow, there are usually a few different “settings” to experiment with. Various shades of color, transparency, diffusion, and blurring are possible. Altering the ‘x’ or ‘y’ axis and choosing whether the shadow falls on the inside or the outside of the element may also be options. Changing just one of these factors can completely transform a shadow’s impact on a design.
When an opaque object blocks the light from a light source, the surrounding region becomes dark, creating a shadow. When light is blocked by an opaque surface, it casts a shadow. An obstruction causes light to bounce off of it and onto the next surface. In this case, the item blocking the light casts a shadow that is flat and two-dimensional in shape. This is the perspective that we will be applying to our designs.
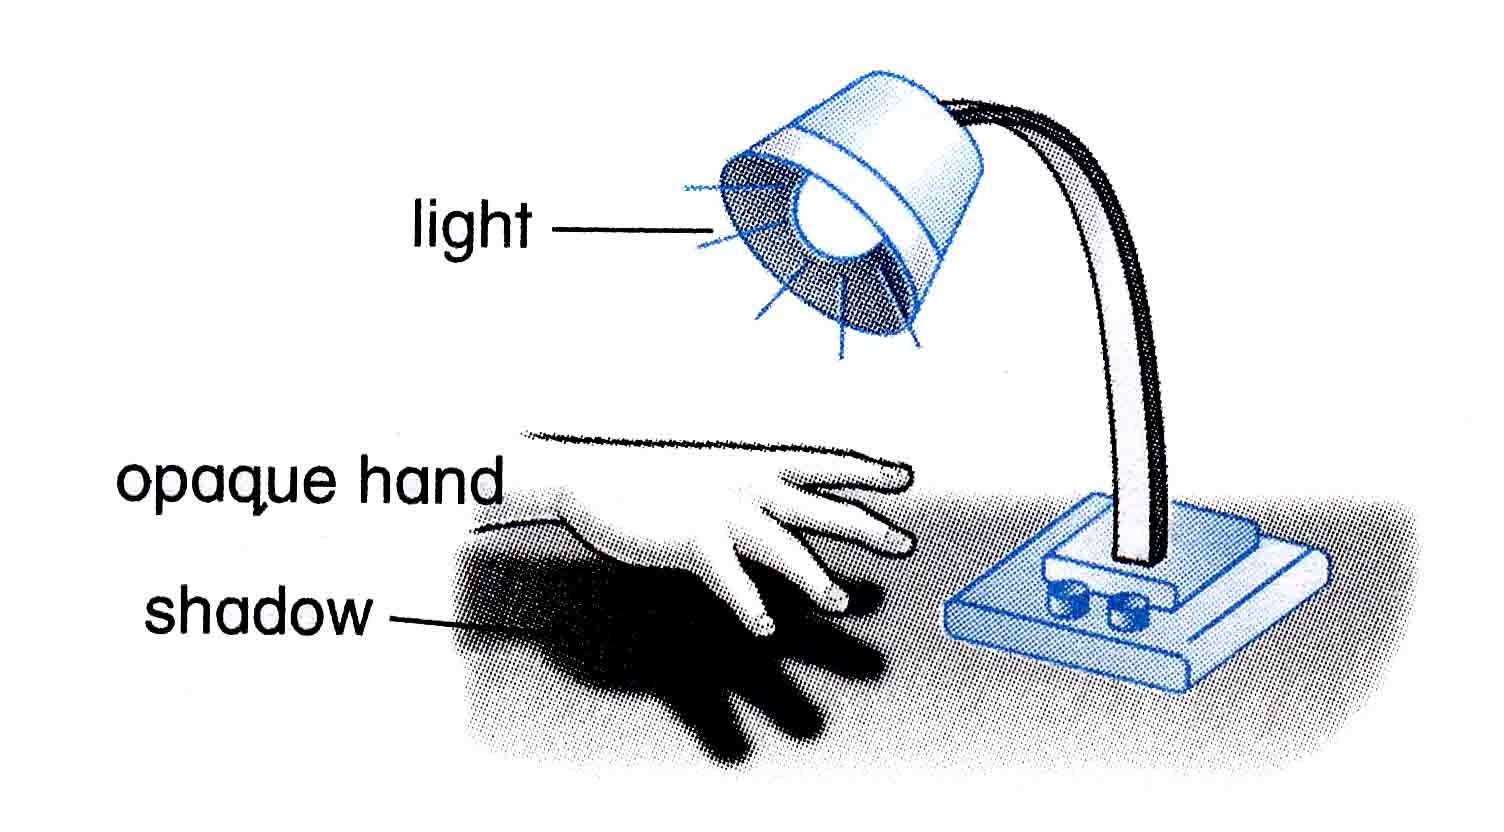
A shadow’s magnitude is proportional to the separation between the source of light and the object casting it. Its shadow will be larger and softer if it is closer to the illumination because the closer it is, the more light it will block. A more distinct and diminutive shadow is cast by a more distant object. Meanwhile, shadows cast by objects that have dark and sharp edges imply a low-lit room. Diffuse lighting gives off the impression that the room is filled with light, as evidenced by the airy, feathery drop shadows. We can use this concept to add more realism to our designs.
Importance of shadows
Shadows are used by designers for a variety of purposes, including enhancing the overall aesthetics of the product, providing an increased sense of depth and realism to the visual experience of the user, and to further improving the product’s functionality.
In order to accomplish this, the shadows should simulate the light dynamics of the real world (both the main light and the ambient light), and they should properly merge into the design.
In 2D and user interface design, the objective of shadows is not primarily to provide the user with a simulation of 3D objects as faithfully as possible, but rather to discreetly direct and simplify the navigation of the interface. It is possible to make the design more user-friendly by incorporating shadows with a slight projection that has been properly calculated. This is an ideal technique to accomplish this.
It is important to keep in mind that there are many different ways to include shadows in your design if you decide to do so. Have some fun experimenting with and testing the many parameters that we discussed in our essay. Examine how the appearance of your design as well as its accessibility are impacted by these options.
Modifying the opacity, angle, or color of a shadow can have a significant impact on how appealing a design is to a viewer. This can be accomplished by changing the position of the shadow. Changing something as simple as the shadow color properties, for example, can completely shift the look of your design, taking it from formal to whimsical and enjoyable.
By modifying the blur or offset properties of your shadows, you can draw the user’s attention to design aspects that they had previously ignored.
Shades and Shadows in Canva
Want your Canva designs to have the same high quality as those found in high-end publications or popular online stores?
You’re in luck because it can now be accomplished in what seems like a nanosecond.
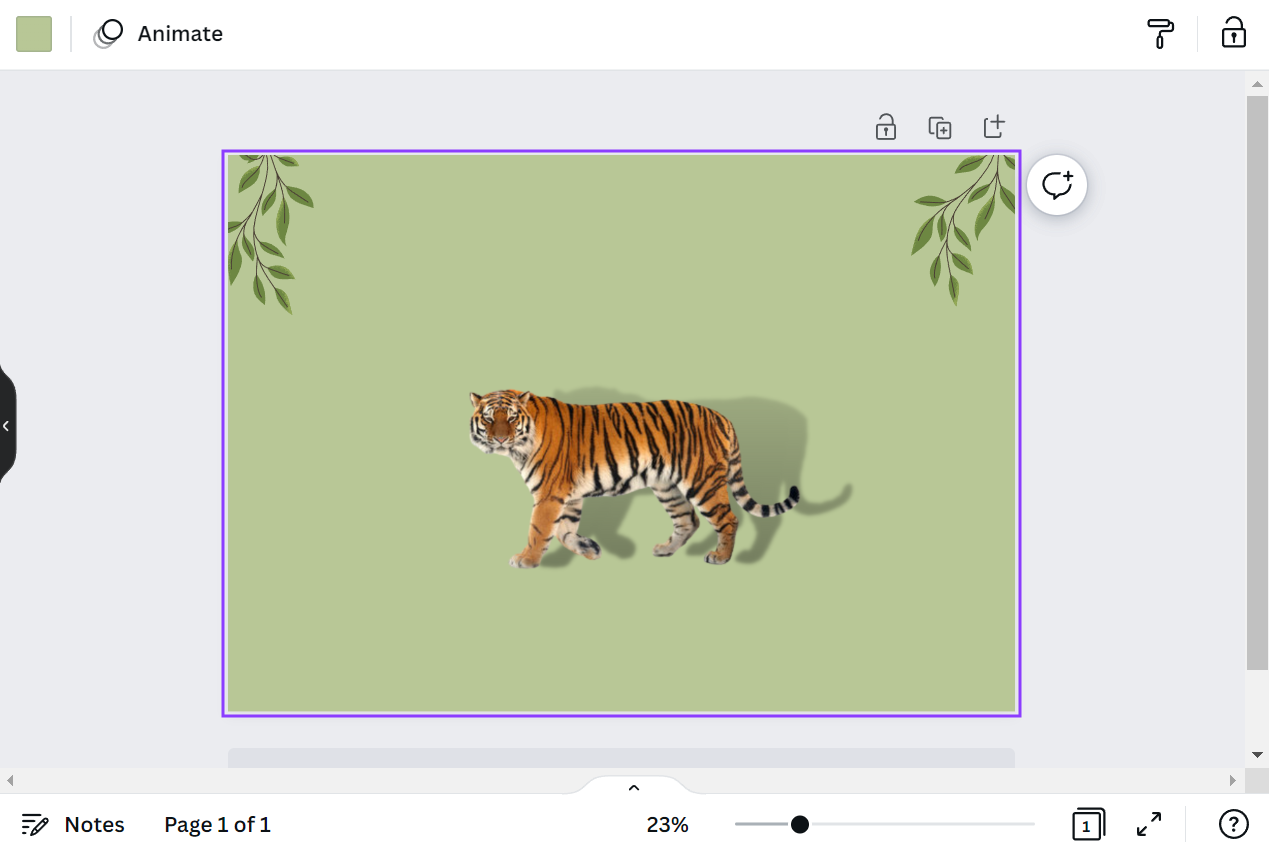
The easiest approach to give a 2D picture some depth is to use shadows. It’s perfect for making mockups of templates (hi, fellow template designers! ), stationary, brand identities, advertisements, shop images, social media posts, YouTube thumbnails, and more besides. Really, the possibilities are limitless.
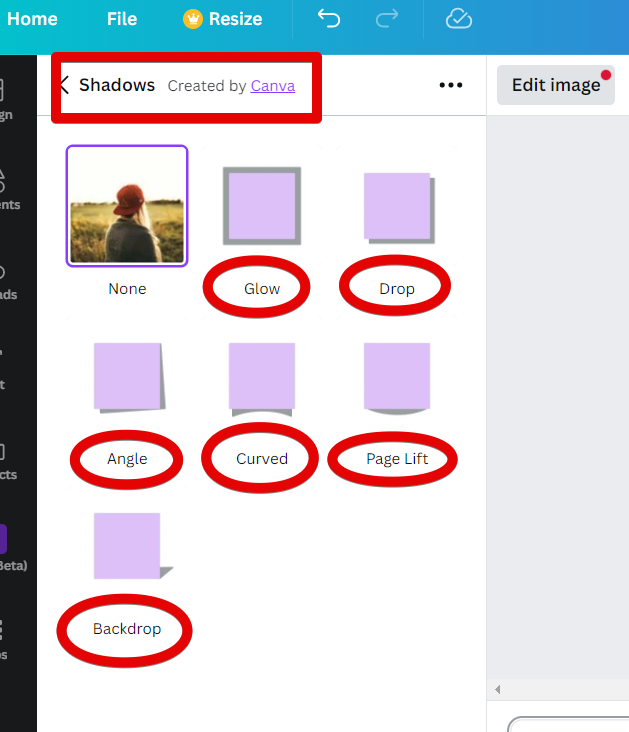
Canva shadow options now include six variations:
- Angle
- Glow
- Curved
- Drop shadow
- Backdrop
- Page lift
How to make a shadow effect in Canva
There is one simple way to create a shadow effect in Canva.
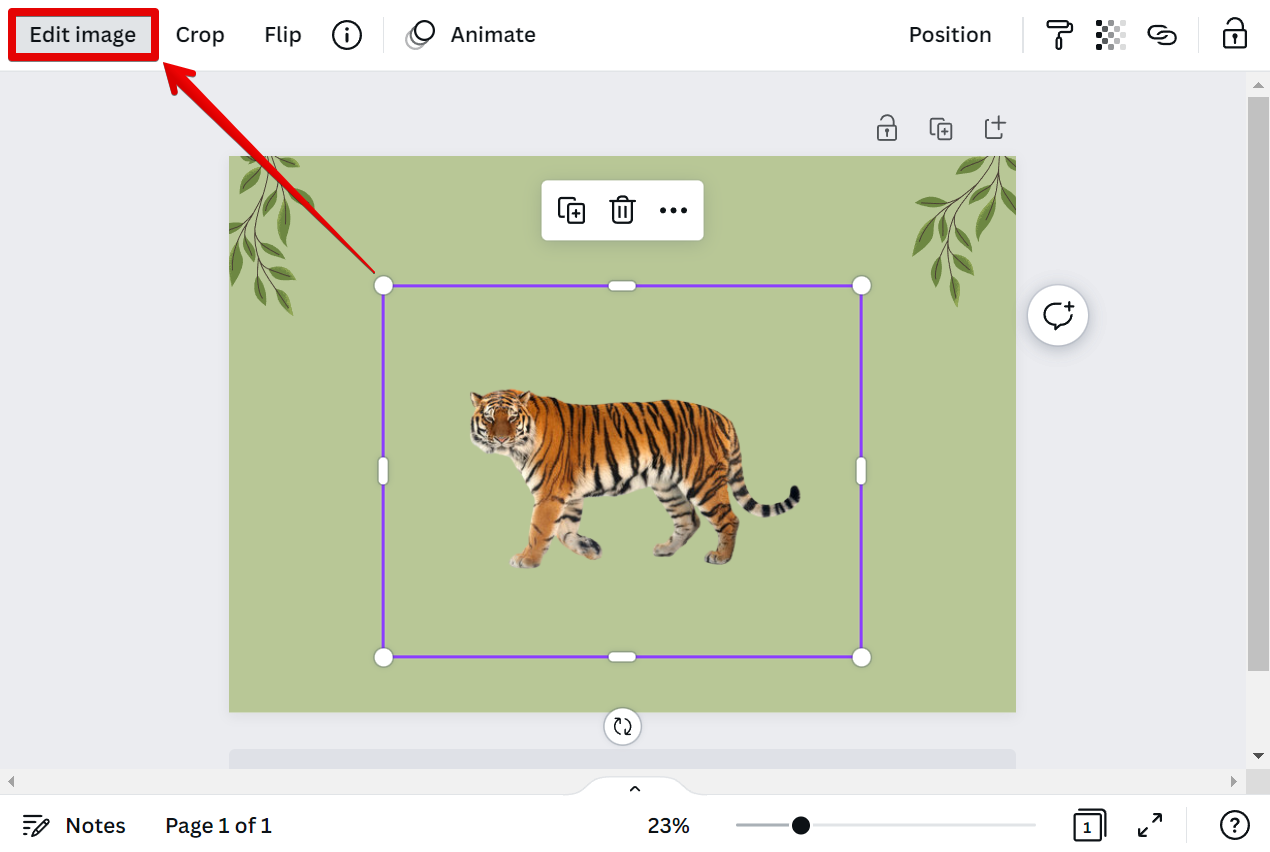
That is to use the built-in Shadows effect. To do this, select the element you want to add a shadow to and click on the “Edit image” button in the toolbar. This will open up the Image Editor panel.
From there, select the “Shadows” effect from the options in the Image Editor.
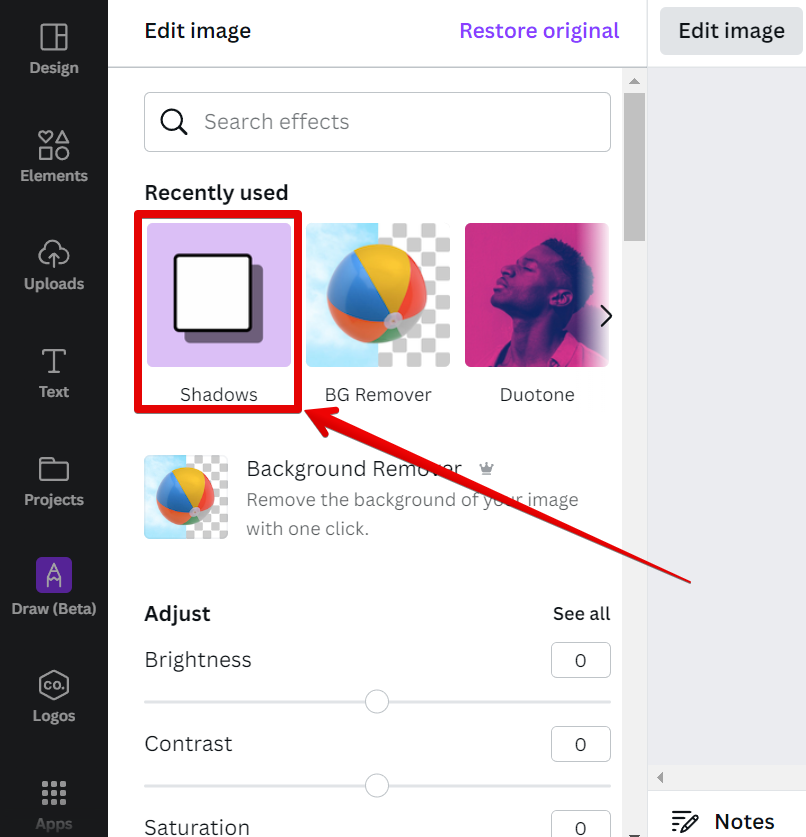
Next is to select one of the Shadow variations available. Then, click on the “Apply” button to save your changes.

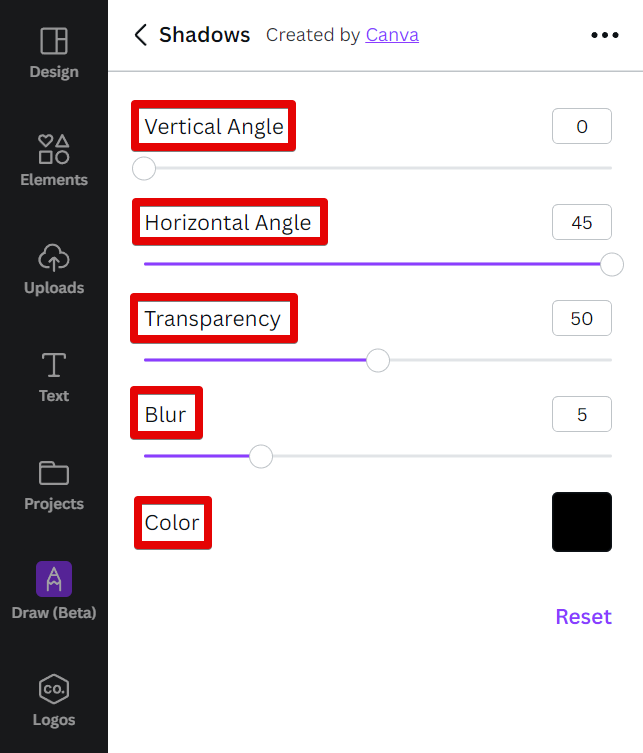
Another option is to adjust the shadow’s settings by clicking on the settings icon in the middle of the selected option itself.
![]()
From there, you can adjust the shadow’s Horizontal angle, Vertical angle, Transparency, Blur, and Color. Once you’re satisfied with the adjustments, hit “Apply” to save it.
And you’re done! No matter your chosen shadow variation, creating shadows in Canva is easy and only takes a few minutes!
Conclusion
When utilized thoughtfully and intelligently, light and shadow effects typically contribute the most to a design. This is in contrast to when they are done haphazardly or only for the purpose of adding more “bells and whistles” to a work in progress.
Now that you have some ideas for your own projects, try some of these strategies, and good luck designing!